|
 A whole lotter fun (putting up otters) tutorial
#2440132
A whole lotter fun (putting up otters) tutorial
#2440132
02/12/11 02:31 AM
02/12/11 02:31 AM
|
Joined: Apr 2009
Posts: 276
alaska
trapped4ever
 OP
OP
trapper
|
OP
trapper
Joined: Apr 2009
Posts: 276
alaska
|
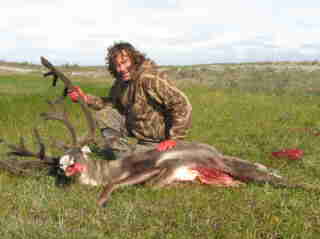
Well, here goes for the otter fleshing PM's. I picked up a couple little ones today, before the weather came up, and sent me home early. I did a demo of fleshing, for you all, with the 2 little guys this afternoon. This is how I put them up for the auction houses. Before we get started, always comb dirt, dried blood, or really any sort of clumps, out of the fur, otherwise tears can happen when you hit these while fleshing. Be especially careful around conibear/ snare marks, bullet holes, nipples, and under arms. All are potential tears. If you do nick or tear, sew it up with dental floss. My fleshing pole is just 4" PVC that I beach combed. Price $0. I cut the top end at a 45 angle. I've been using this one for years. There are a few advantages and disadvantages to using PVC pipe, but we'll get to those later. Here's my set up. 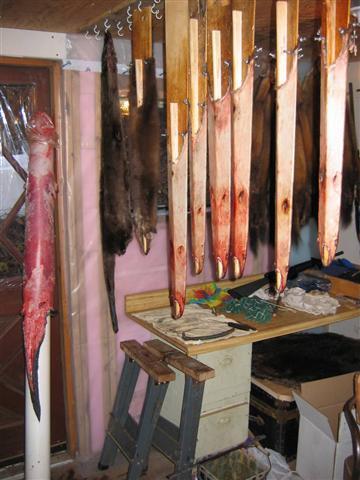 I use the beaver knife down to just below the front legs, all the way around. Like this....  If you have problems with the fat on the front legs, you can put them on a marten board or something for fleshing. I don't usually need to, but showed how, just to illustrate what I'm saying. Here's the front leg over my marten/ mink fleshing pole, which is 2" PVC, also beach combed. This helps stretch the skin taut for fleshing. I use my beaver knife on the front legs also. 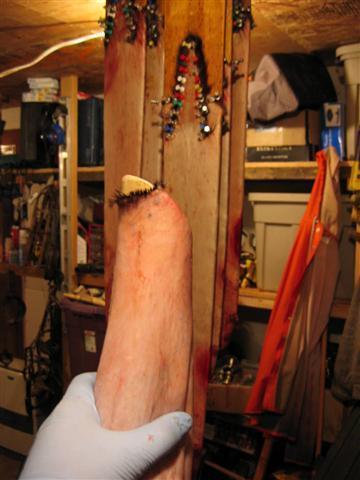 Next, I lightly score the membrane into 5 separate lengths. I split down the center of the back, where there is a natural separation. Then, on the belly side, where the fat and membrane meet, I kind of fillet back towards the membrane, with the knife held very flat to the hide. Next, I split each of the now two pieces of membrane in half. This makes two pieces of membrane on each side, and a row of fat down the belly, for a total of 5 separate strips to be fleshed. NOTE: when scoring the membrane be EXTREMELY careful not to score into the leather. Most adult otters have a layer of fat between membrane and hide, so it's easier with them. Juveniles are much thinner skinned, so great care is needed, and I sometimes all together omit this process with little ones. It does make adults much easier to flesh, as you don't ever have to reposition the hide. Just rotate the fleshing pole slightly, and start a new strip. 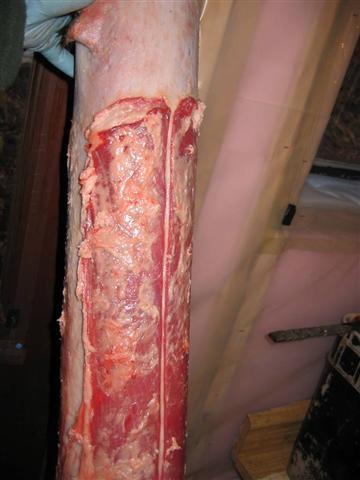 These strips are then individually fleshed down to the skirt area, taking care to keep fat, grease, meat, blood off the fur, or pole. I usually cut off the strips as I go. This takes maybe 5 minutes. Depends on the otter though. Some older ones have a lot of gristle. My fleshing knife is a piece of 1/4" X 3/4" X 22" bar stock I scrounged from an old homestead site 20 odd years ago. Price $0. It's all I ever use for a flesher on otter. I did add duct tape to the "handles" about 15 years ago, as they kinda dug into my hands otherwise. Here it is after the strips are fleshed. 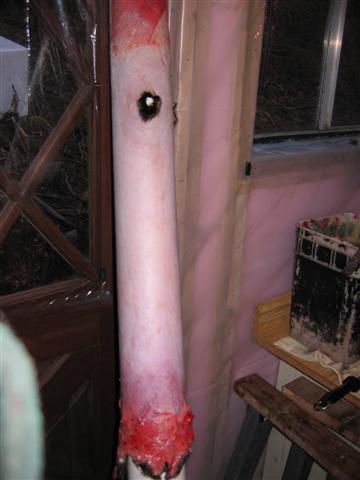 Next, I move the hide up the pole. Notice the front leg is now on the pole tip. One advantage to using the pipe here, is that the head is dropped back down the center of the pipe, keeping blood smears off your nice clean white leather. I usually have a lot of live foot trapped otter, that I dispatch with a .22. So some blood in the head area is common for me. Moving the hide up the pole like this, gets the skirt/ tail up to the right height for working on. NOTE: When working on the skirt area, you don't need to worry too much about the last little bit of fat on the belly side, between the legs, as this area will be trimmed for an inspection window. 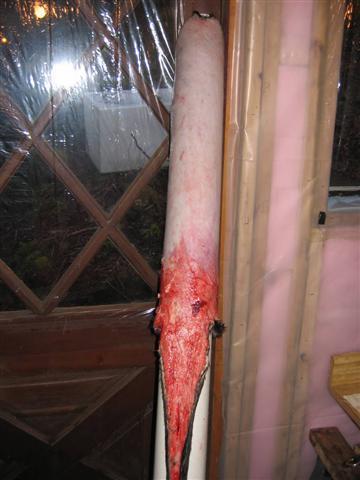 Then, I trim the last couple inches of fat from the skirt and back legs, using the beaver knife again. Be very careful around the nipples, as they tear easily. When done, it should look like this. 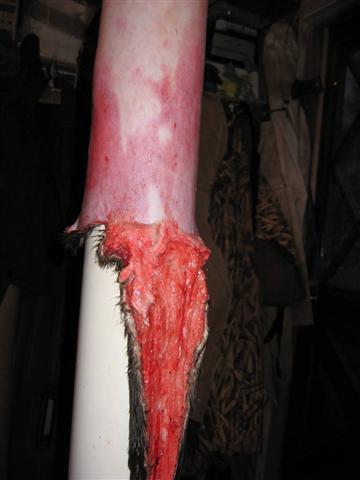 OK, now comes the fun part. I get the most questions about the tail. I just fillet it off with the beaver knife, starting from the top inside, of the "veins" of fat that run the length of the tail. Working from the center towards the outside edge. A super sharp knife helps a lot here. This is how I start... 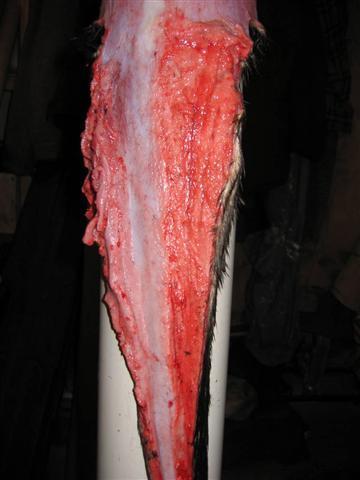 Then, just carefully work your way out to the edge. 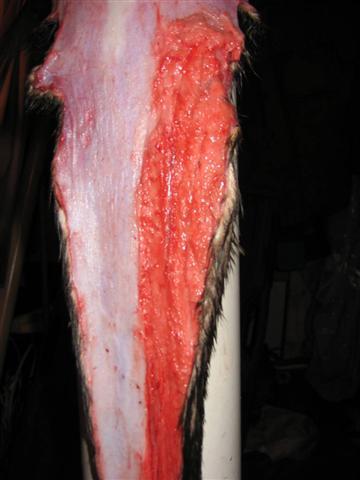 Here is where a wooden pole works a little better, as you can temporarily tack the tail open, to make fleshing easier. I hold my knife very flat to the hide, and pretty vertical to the tail, while doing this "filleting", like this.... 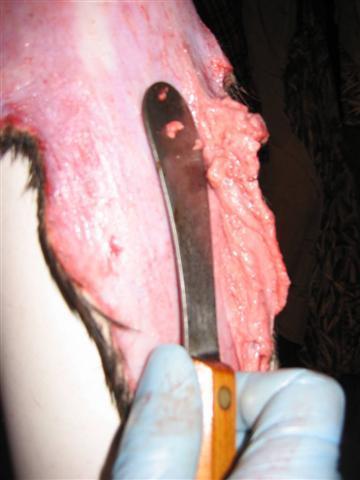 Here's the finished tail. 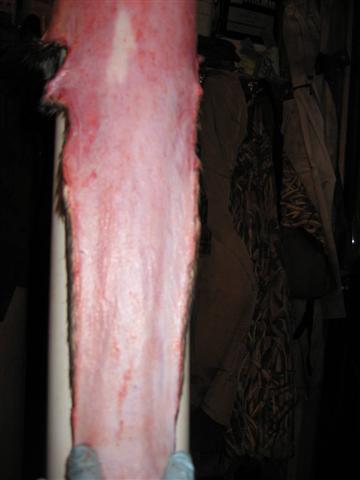 Last area to do now is the head/ neck. For this, I lay the pole across my knees, and keep the neck area tight by pulling down on the front leg holes. I flesh back towards the head, using a longer, more flexible bladed type knife. 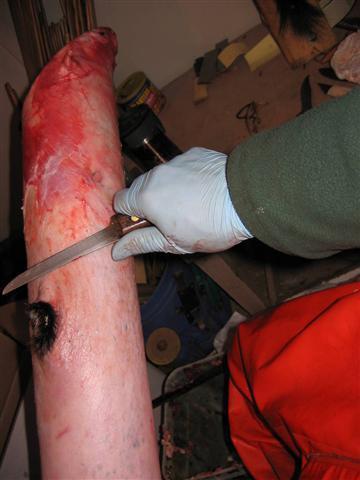 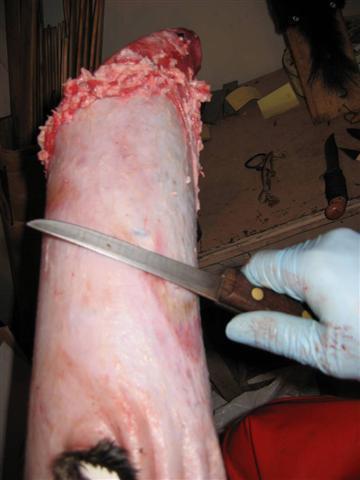 Finished products. NOTE: Inspection window cut out on belly side, lower lip removed for auction tag, and I try to remember to tack an eye hole open for CITIES tagger. 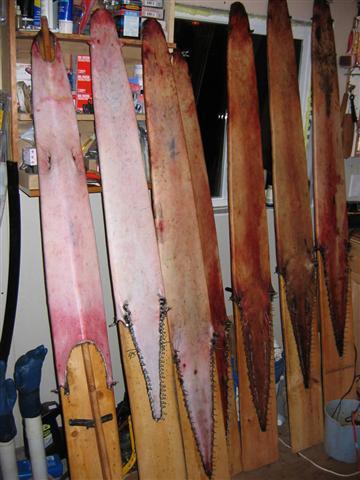 The tools I use for both skinning and fleshing otters. The safety razor rarely gets used. Only on older, more gristle laden necks. The older otter seem to have a lot more of this. Little ones tend to be much thinner skinned, so be especially careful on them. 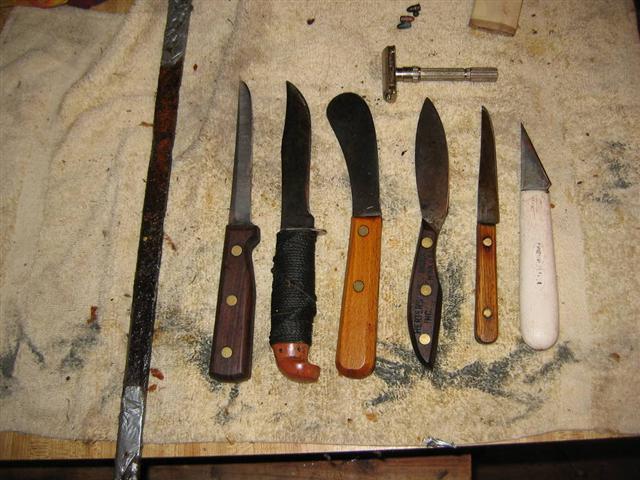 Todays catch before processing. 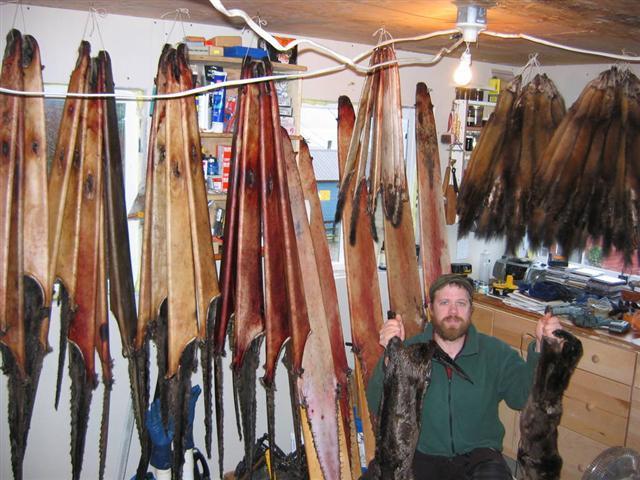 I'm sure I left a few things out. I hope this helps some of you. Questions, comments or input, feel free. My favorite picture of the day. One of daddy's little helpers. 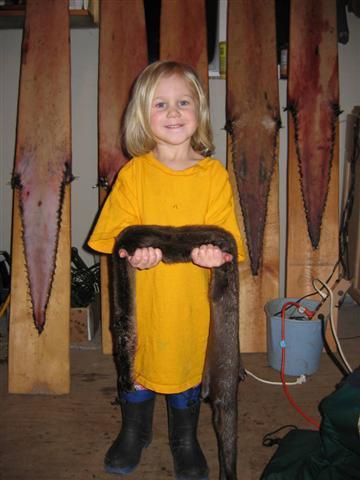
|
|
|
Re: A whole lotter fun (putting up otters) tutorial
[Re: trapped4ever]
#2440154
02/12/11 02:53 AM
02/12/11 02:53 AM
|
Joined: Dec 2009
Posts: 490
Fairbanks AK
Aknative
trapper
|
trapper
Joined: Dec 2009
Posts: 490
Fairbanks AK
|
Thanks much for putting this up!
Rumors of my assimilation have been greatly exaggerated.
|
|
|
Re: A whole lotter fun (putting up otters) tutorial
[Re: trapped4ever]
#2440201
02/12/11 04:41 AM
02/12/11 04:41 AM
|
Joined: Dec 2010
Posts: 2
Alaska
sharksinthesalsa
trapper
|
trapper
Joined: Dec 2010
Posts: 2
Alaska
|
Wow nice write up!! Your hides look awesome when done. Just an idea for your tail. You said that it would be better to have a wooden beam to tack the tail flat. What if you had several rubber bands that you could put one above where your fleshing and one below. And maybe a fewdown the pipe that you coul slide up if you cut one. That might hold it better for you. Just a thought
Beaver, as many as stars in the sky!! Fighting one another to get in your trap, screaming take me Bill Tyler, take me!!
|
|
|
Re: A whole lotter fun (putting up otters) tutorial
[Re: trapped4ever]
#2440359
02/12/11 09:58 AM
02/12/11 09:58 AM
|
Joined: Oct 2008
Posts: 954
PWS, AK
FishinHank
trapper
|
trapper
Joined: Oct 2008
Posts: 954
PWS, AK
|
Awesome!!! Thanks for posting this, it's going to help me out a lot.
[TravC]: an educated coyote is like a fat girl on the diet....she dont slip up with a cheeseburger but sooner or later she goes for the bigmack
|
|
|
Re: A whole lotter fun (putting up otters) tutorial
[Re: trapped4ever]
#2440594
02/12/11 12:06 PM
02/12/11 12:06 PM
|
Joined: Dec 2007
Posts: 5,514
Orergon
alaska viking
"Made it two years not being censored"
|
"Made it two years not being censored"
Joined: Dec 2007
Posts: 5,514
Orergon
|
That's a great lesson. Otter are about my least favorite critter to put up, and these southeast otter can be incredibly fatty. I can easily spend an hour or more on one!
Just doing what I want now.
|
|
|
Re: A whole lotter fun (putting up otters) tutorial
[Re: tmrschessie]
#2441161
02/12/11 07:01 PM
02/12/11 07:01 PM
|
Joined: Dec 2008
Posts: 1,997
Kelowna BC Canada
trapper ron
trapper
|
trapper
Joined: Dec 2008
Posts: 1,997
Kelowna BC Canada
|
Excellent tutorial and a great job of fur handling. Notice the nice inspection window and how the tail is boarded short and wide rather than long and skinny. Very clean leather also.
For me I use the beam for the whole process, then tidy up with my safety razor and beaver knife also. Do not want to high jack this excellent thread but I could post a few pictures to add to it also, but only with the permission of the OP.
Member BCTA
Trapping Instructor
"It's what you learn after you know it all that really counts."
|
|
|
Re: A whole lotter fun (putting up otters) tutorial
[Re: trapped4ever]
#2441448
02/12/11 09:10 PM
02/12/11 09:10 PM
|
Joined: Sep 2010
Posts: 442
catskills,ny
watermann
trapper
|
trapper
Joined: Sep 2010
Posts: 442
catskills,ny
|
Thanks for taking the time to teach us. Really professional post . Grampa , Anthony & Emiliano
2nd season trapping
Yotes 1 ,finally
red fox
greys
fisher 2
Coons 1
beaver
grinners2
mink
rats
|
|
|
Re: A whole lotter fun (putting up otters) tutorial
[Re: trapped4ever]
#2442021
02/13/11 02:37 AM
02/13/11 02:37 AM
|
Joined: Dec 2006
Posts: 2,741
SW Alaska
otterman
trapper
|
trapper
Joined: Dec 2006
Posts: 2,741
SW Alaska
|
Great post T4E I clean skin them but have been thinking about trying a beam out when the new fur shed gets finished so next winter this may help me figure it out. How long does it take you to skin and flesh one
We get out of life only as much as we really want and work hard enough to achieve
|
|
|
Re: A whole lotter fun (putting up otters) tutorial
[Re: trapped4ever]
#2442106
02/13/11 05:51 AM
02/13/11 05:51 AM
|
Joined: Apr 2009
Posts: 276
alaska
trapped4ever
OP
trapper
|
OP
trapper
Joined: Apr 2009
Posts: 276
alaska
|
Ok, here's an update to answer more PM's. On the front legs, I use the beaver knife vertical on the underside of the front legs, kind of scraping down. Once I get to the armpit area on down, I resume using it flat to the hide. If you try to do the whole thing flat ,in a shaving motion, its easy to cut the hide, as you transition from leg, "2 layers of fur" to armpit, "1 layer". 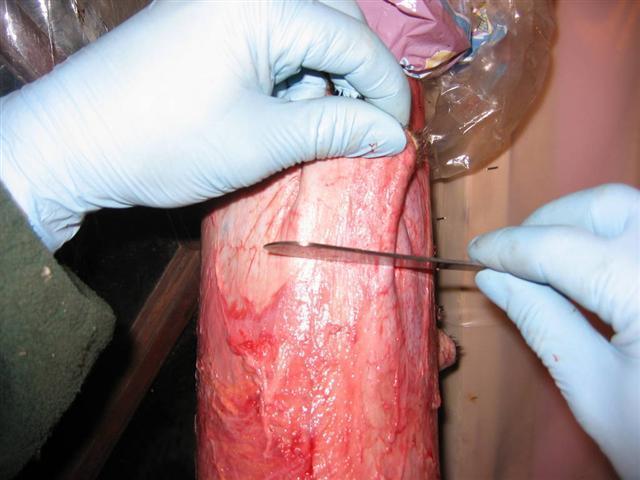 The membrane around the legs can just be pulled out, and trimmed off. 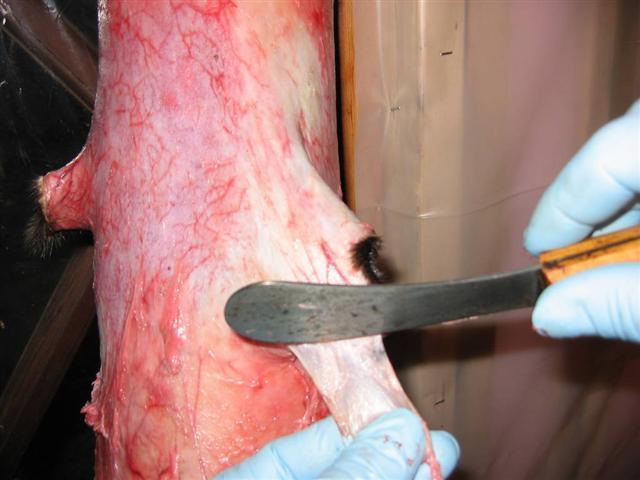 Along the belly fat, I trim the membrane in a filleting motion. In this picture, the membrane is scored, and rolled back on itself. The row of belly fat is under the beaver knife blade. This separation is necessary, if you want to be able to flesh the strips of membrane separate of the fat along the belly, as they are usually adhered to each other, especially in the chest area. 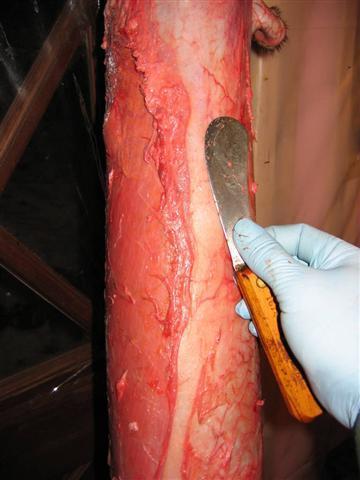 On these, notice the front legs. If they are skinned down to the feet, generally you can just tuck them inside the hide. If you cut them off up the ankle further, you may need to nail or tack them shut, like one in the photo. Also, notice the belly boards. I generally wedge something under them. If you don't, after the otter dries, it can be tough getting the belly board out. It doesn't take much, just enough to give you a little slack under the belly board, so it slips right out. 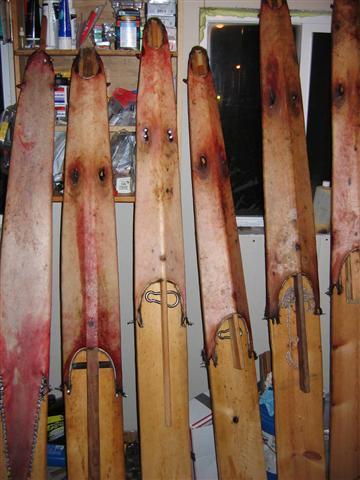 On the tails, I just try to keep them wide, and as straight as possible. With a little practice, they get real easy. 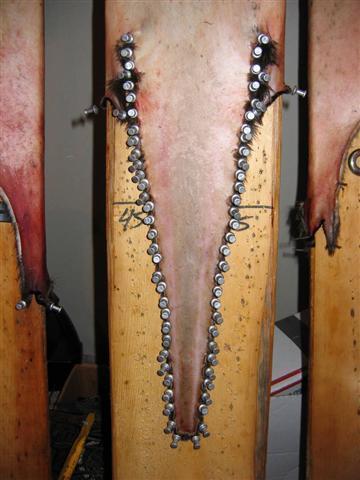 Pull down the tail snug, and put in a couple nails on each side of the tail base, to hold it in place. Always do the tail first on any species, not the legs on the belly side of the board. Doing the tail first, gives you maximum length. 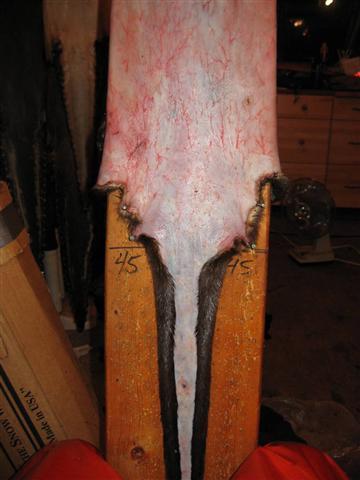 Then I rough tack or nail out the tail. A couple nails between each of these will finish this one off. 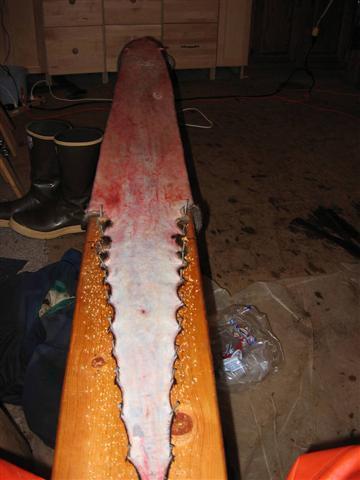 For the inspection window, I start up maybe 1 1/2" and cut out a small crescent shaped piece of fur. This is always done after the otter is boarded, and tail tacked out. Notice I scored the approximate piece to remove. 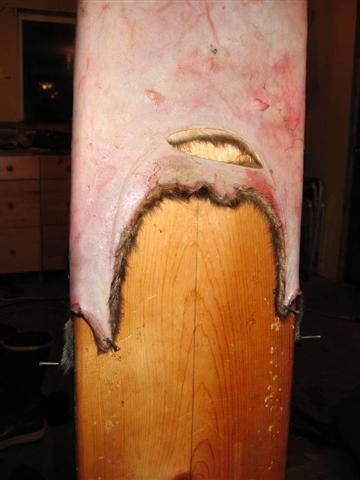 I even went so far as to put a hole in one, just to show proper repair.  I use dental floss. Notice all the fur is pushed back thru the hole, and none is showing on the leather side. 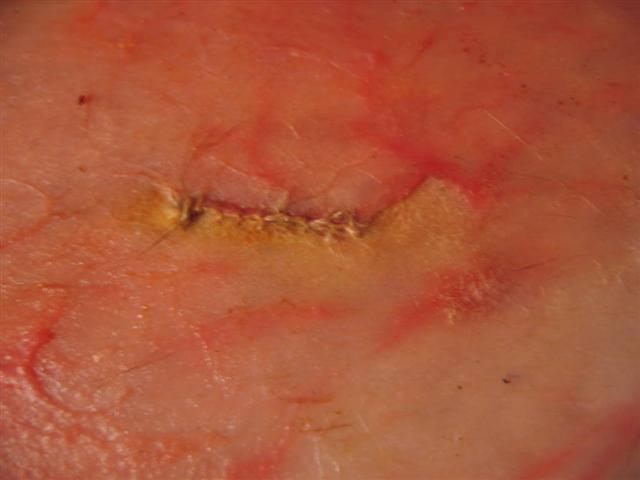 This is what I want my inspection window to look like. 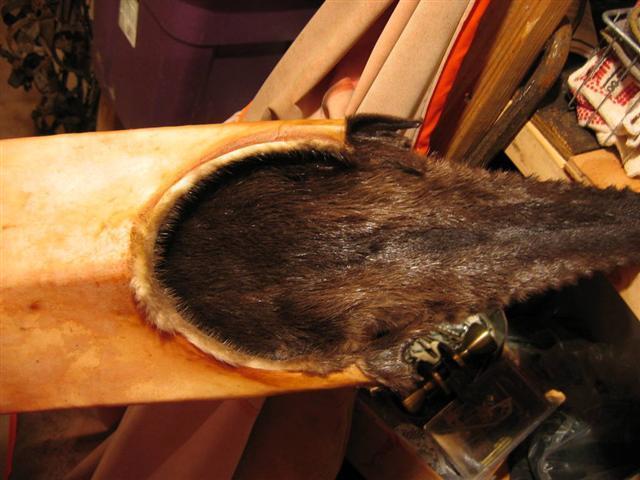 Any other questions or comments? Feel free to PM if you prefer. Trapper Ron, yes, by all means add on if you wish. Otterman, depends on the otter, but you already knew that, huh? Do you do the case skin, clean skin method, starting from the back end, working towards the front. Sharpened moose-shin bone, native style? Or do you do them like beaver? Or maybe another way?
|
|
|
Re: A whole lotter fun (putting up otters) tutorial
[Re: trapped4ever]
#2442660
02/13/11 02:10 PM
02/13/11 02:10 PM
|
Joined: Dec 2006
Posts: 2,741
SW Alaska
otterman
trapper
|
trapper
Joined: Dec 2006
Posts: 2,741
SW Alaska
|
I case skin from the tail and work towards the head have used a bone in the past but they just don't do the job for me with tendinitis in the elbows so stick to a razor sharp beaver skinning knife like you use with the wooden handle & round nose tip.
We get out of life only as much as we really want and work hard enough to achieve
|
|
|
Re: A whole lotter fun (putting up otters) tutorial
[Re: trapped4ever]
#2445137
02/14/11 07:16 PM
02/14/11 07:16 PM
|
Joined: Dec 2006
Posts: 4,990
Gnome, Alaska
Alaskan
"AMY SUE"
|
"AMY SUE"
Joined: Dec 2006
Posts: 4,990
Gnome, Alaska
|
Threads like this are what make Tman so great. What a GREAT and informative thread!!!
"Goats pee in the water sheep drink."
Life member: NRA, NTA, AkTA, AkFTA, WiTA, MnTA, MoTA, OrTA
|
|
|
Re: A whole lotter fun (putting up otters) tutorial
[Re: trapped4ever]
#2447513
02/15/11 09:47 PM
02/15/11 09:47 PM
|
Joined: Dec 2008
Posts: 1,997
Kelowna BC Canada
trapper ron
trapper
|
trapper
Joined: Dec 2008
Posts: 1,997
Kelowna BC Canada
|
If you don't have access to fine sawdust, cornmeal mixed with kitty litter absorbs grease really well. Some of the otter guys around here use it a lot. Even after a pelt is fleshed, they put it on, then wipe it off with a rag, after the pelt is dry. It absorbs a lot of grease out of the hide, and keeps them from yellowing at all. I just use lots of paper towels, and wipe off oil, as it beads up on the pelt. What works well is J Cloths. Do you have those in the US. We probably import them from you  Anyway they soak up those beads of fat on both otters and beaver. Keep using the same one over and over and it gives the pelt a nice fresh look. One cloth will last for maybe 10 otters.
Member BCTA
Trapping Instructor
"It's what you learn after you know it all that really counts."
|
|
|
Re: A whole lotter fun (putting up otters) tutorial
[Re: trapped4ever]
#2459873
02/21/11 01:20 PM
02/21/11 01:20 PM
|
Joined: Mar 2009
Posts: 167
Eastern Canada
butcha
trapper
|
trapper
Joined: Mar 2009
Posts: 167
Eastern Canada
|
Awesome guys!I was goin to mention the Razor Ron.For you guys that have never tried the razor on Otter, you won't believe how easy the tail, gristle on the neck, or gettin the saddle started is.I make mine out of disposables, single blade.I gotta put up a few tomorrow, I'll try to get some pics.I've gone to usin mesh for the tail on all Otter and Mink.I find it much less time consuming with the same and result.I never flesh Otter without fur-grade saw dust.I just use a one hand scraper with a old Ranch Fox beam.
Last edited by butcha; 02/21/11 01:22 PM.
If God didn't want us to eat animals,why did he make them out of meat?
|
|
|
Re: A whole lotter fun (putting up otters) tutorial
[Re: trapped4ever]
#2462390
02/22/11 09:47 AM
02/22/11 09:47 AM
|
Joined: Feb 2007
Posts: 3,561
Northern MN
Dale Torma
trapper
|
trapper
Joined: Feb 2007
Posts: 3,561
Northern MN
|
Great post! Your pelts look great. I see so many greasy, poorly put up ones on fur tagging day, when they can be done clean and grease free just as easy if people would look at this post.
I usually put up my otter similarly, but havn't tried the razor. I have more troubles with small otter, cut a couple holes in one this year after doing some large otter nicely. I think my flesher was too sharp for the young small otter. I use a pvc beam also, taken out of the dumpster at work. I will try the sawdust too, I do have access to large quantities of ground corncobs, I imagine that would work also. I also frost dry mine in the -20 degree weather or colder and they come out snow white and tan great. Takes a long time to frost dry though, and you can't let the sun shine on them at all even in the cold or they will not turn out well.
|
|
|
Re: A whole lotter fun (putting up otters) tutorial
[Re: trapped4ever]
#2465612
02/23/11 04:40 PM
02/23/11 04:40 PM
|
Joined: Sep 2009
Posts: 262
Connecticut
FEZZ
trapper
|
trapper
Joined: Sep 2009
Posts: 262
Connecticut
|
this is a great tutorial for some of us younger trappers.I have a question. Would i be able to use a beaver skinning knife to flesh the gristle of of a coon if i had to?
Tight chains and full traps
|
|
|
Re: A whole lotter fun (putting up otters) tutorial
[Re: shorthair]
#2599490
06/02/11 06:23 AM
06/02/11 06:23 AM
|
Joined: Mar 2010
Posts: 743
Ashe co. mountains n.c
trapmando
trapper
|
trapper
Joined: Mar 2010
Posts: 743
Ashe co. mountains n.c
|
Outstanding job with this post.......THANK YOU
A trap is only a trap if you dont know about it. If you know about it, its a challenge
|
|
|
|
|